Showing posts with label Fun Time Projects. Show all posts

Thursday, March 29, 2012

Painted Paper

This project came out of a need to use up pieces of card stock and some left over paints.  The results is a paper quilt wall hanging.

Painted Paper
Begin by painting card stock with colors that you might find in a sheet of metal, such as copper.  The sample shown is painted with gold, copper, green and a bit of red.  Keep adding and blending until you get something that you like.  You could also go in an entirely different direction and do a blend of pastels.  That would also look striking.

 Next, cut the paper into two-inch squares or a reasonable facsimile of.  Finally, cut two and a half inch squares out of black cardstock or some other black paper, such as construction paper, that you happen to have on hand.  Paste or glue each two-inch square onto a black square.  This will give your copper square a black border, which will set off the colors.

Finished Piece - Copper Quilt
For the piece in the picture the squares were then attached to a large piece of black poster board with some webbed packaging material in between the squares and the black poster board.  The squares were positioned with the grain of the paint going in opposite directions, alternating horizontal with vertical throughout the piece.  Because the piece is paper it is extremely lightweight and easy to hang.

This is a simple project with just a few steps that are easy enough to complete while visiting and thinking up other color schemes to play with.  Enjoy!

Thursday, February 23, 2012

Pill Bottle Pencil Holder

Pill Bottle Pencil Holder
Another idea from our year of recycling projects.  This activity came about because someone brought a bag of pill bottles to our group along with a challenge.  What could we make out of pill bottles? Because the bottles are so light weight I decided that they had to be used in groups.  Gloss gel to the rescue!

For those of you who don't know me you probably don't know that my favorite  product to use for an adhesive is gloss gel.  For this project we took three of the pill bottles, which happened to be triangular,  spread a bit of gloss gel on the parts that would be touching, and held them together, overnight, with a rubber band. 

By morning the gloss gel was dry and the bottles were beautifully welded together.  Then it was time to decorate.  As you can see, the bottles in the picture are simply decorated with plastic flower-like pieces that are also held in place with gloss gel.  Any small embellishments would work.

This idea also works with round containers.  Gloss gel dries clear so fear not if a participant uses a goodly amount of the product.  Other ideas for such a container might be for holding paint brushes or straws.   How else could you use them?  What else could you, or have you made with empty pill bottles?    Would love to hear from you with your ideas.

Friday, January 13, 2012

Recycling Furniture


OK.  So maybe a hand-painted dresser isn't within your artistic capabilities.  Start with a smaller piece of furniture.  But if there are some drab looking dressers sitting around that might cheer up the surroundings if they were spiffed up a bit, try this.


The dresser in the picture sits in our guest bedroom at home.  It was an old, inexpensive piece that didn't add much to it's surroundings.  The transformation was brought about by first priming and then applying a coat of pale green paint to the dresser.

For the floral decor on the front I took a poster and cut it into strips that were the size of the drawer fronts.  That's right.  I did not paint the flowers onto the front of the dresser.  It's a poster cut into strips that are glued onto the drawer fronts.  Remove the drawer pulls first and then reattach them when the poster is in place.

Next I sponged some of the green paint along with some cream colored paint along the sides of the poster to blend in the edges.  Voila!  A lovely piece with not a lot of work or skill.  Just a good way to use and use up in order to make surroundings just a little nicer.

Happy recycling!

Saturday, December 31, 2011

Jewel-Toned Bottles

Happy New Year!  For those of you making resolutions let me recommend those put forth by one of my personal heroes, Jill Conner Browne, also known as the Sweet Potato Queen.  Jill urges people to make resolutions they can succeed at in order to boost their self-esteem.  One of her favorite resolutions is to "Eat More".  Needless to say, and so I won't.

One of my resolutions this year is to create projects with a recycling twist to them.  Another is to use metallic paint, which make projects simply pop.  Prang metallic paints, user friendly and inexpensive, are available online.  I discovered one overstock site that has a set of twelve 16 ounce bottles of Prang metallic for $33.  Explore and see what shiny things you can come up with.

This project is simply torn, used dryer sheets glued to glass or plastic bottles with my favorite adhesive, gloss gel.  Assemble your supplies of glass or plastic bottles, old brushes about 1-inch wide or foam brushes, gloss gel, and used dryer sheets cut or torn into squares that are 2 inches or smaller.

Simply brush gloss gel onto an area of the bottle, apply a piece of dryer sheet and brush a bit more gloss gel on top.  Continue until the entire bottle is covered and has a nice textured look.  I sometimes do two layers or more simply to get more texture, which I like. 

When the bottles are dry, which is generally in a day or so, dab on a few colors of the metallic paint, sticking to basic matches like green and blue or orange and gold.  Of course, gold simply looks great with everything.  Some of the bottles have an added piece of bead trim at the top, stuck on with gloss gel.  When finished, these bottles make lovely vases for artificial flowers or simply as a grouping of glowing bottles.

Happy Creating!    Happy New Year!

Friday, November 18, 2011

Puzzle Cards

This week's project was to decorate some blank puzzles that I purchased from Dawn Wooderson of WoodSong.   The puzzles we used were 8.5 x 11 and by placing a layer of removable contact paper onto the backs of the puzzles they remained wonderfully stable while we decorated.  Our plan was to make them into some kind of a greeting so the could be disassembled, placed in an envelope, and given to a friend or family member for the holiday season.

Our medium of choice was acrylic paint but crayons or markers would also be good on the paper surface of the puzzle.  Even the most timid artist was able to paint their puzzle.  After that we stenciled on designs and lettered on greetings freehand with additional paint or wrote with marking pens.

One of the participants decided to keep her puzzle together and keep it in her room.  Others had already chosen family members who would be gifted with their creation.

For those wishing to purchase puzzles Dawn has puzzle blanks available in:
   8x5.5   12 pieces    pkg of 12 for $7 or pkg of 24 for $13.50
   5x7       9 piece with frame  pkg of 12 for $7
   4x5.5    9 piece     pkg of 24 for $11
   8.5x11  12 piece   pkg of 12 for $16
Prices do not include shipping.

The best way to order is by email - wwodsong@aol.com.  Dawn will then contact buyers to get payment information.  Best yet, Dawn is offering a 10% discount until the end of the year for those who mention seeing this offer on the Second Childhood Creation blog!

These puzzles proved to be an inexpensive and fun project for our weekly gathering.  Also a unique way to create a holiday greeting!

Wednesday, November 2, 2011

Improvising

Success is Being Together!
My original idea was to paint pots, place some kind of branch-like object into each pot, and then attach leaves inscribed with "things to be thankful for" onto the branches and call them our Thanksgiving centerpieces.  Seemed like a good idea at the time.

The problem occurred when I tried to find branch-like objects that would work without actually skulking around in the middle of the night, hacking away at the neighbor's shrubs.  Time to shop!  I finally found some glittery branch-like fronds that I thought would work.  Problem was, as I worked on the idea at home, that the frond were so lightweight that any amount of weight on them brought them down and the whole thing began to look like a spider.  I am not thankful for spiders, though I'm told that I should be.

I obsessed about this, trying different ways to attach and different things to attach, until about 2 hours before the group was to begin.  Then I did the next best thing and sat down with a good book, forgetting about my creative "challenge".  I also reminded myself that the purpose of the group is to have a good time and create community, along with creating the project at hand.  So why not get out the bags of artificial flowers and make Thanksgiving/fall centerpieces.  This thought occurred to me about an hour before the group was to meet.   

We began by painting our flower pots a dark green.  Onto that we dabbed copper and iridescent yellow.  Next we pushed a piece of florist foam into the pot and stuck the glittery fronds along with silk flowers into the foam.  A good time was had by all.  Our tables are lovely.  Good things happen when we go with the flow!

Wednesday, October 19, 2011

Christmas Centerpiece - Part 1

This year we decided to get a jump on Christmas and turn our centerpiece project into two sessions.  For session one we made our gift wrap print that would cover our boxes.  Session two, still to be completed, will have us covering boxes with our original papers and adding ribbon and a star to the center.  That session will happen in about two weeks, giving us a session in between to create a holiday gift for giving or something for Thanksgiving.

At home, a few days before the session, I made up samples, using red, green, and gold acrylic paint, of what the paper could look like.  I used simple stamping tools that included cardboard tubes from paper towels, corks, and strips of cardboard that were dipped into paint to make lines and dots.  The samples looked like this.


If it's one thing I've learned over the years of doing projects with seniors, is that their ability to interpret projects takes creativity to new levels.  Their stamped papers looked like this.


Guess Who's The Class Clown
For the sample box I cut the paper into two inch squares and pasted on the squares, overlapping as I went along.  For our group session we'll cut their creations into large enough pieces to cover an entire side of a box to better exhibit their work.

Enjoy your holiday projects!

Thursday, October 13, 2011

Witches and Monsters and Fun, Oh My!

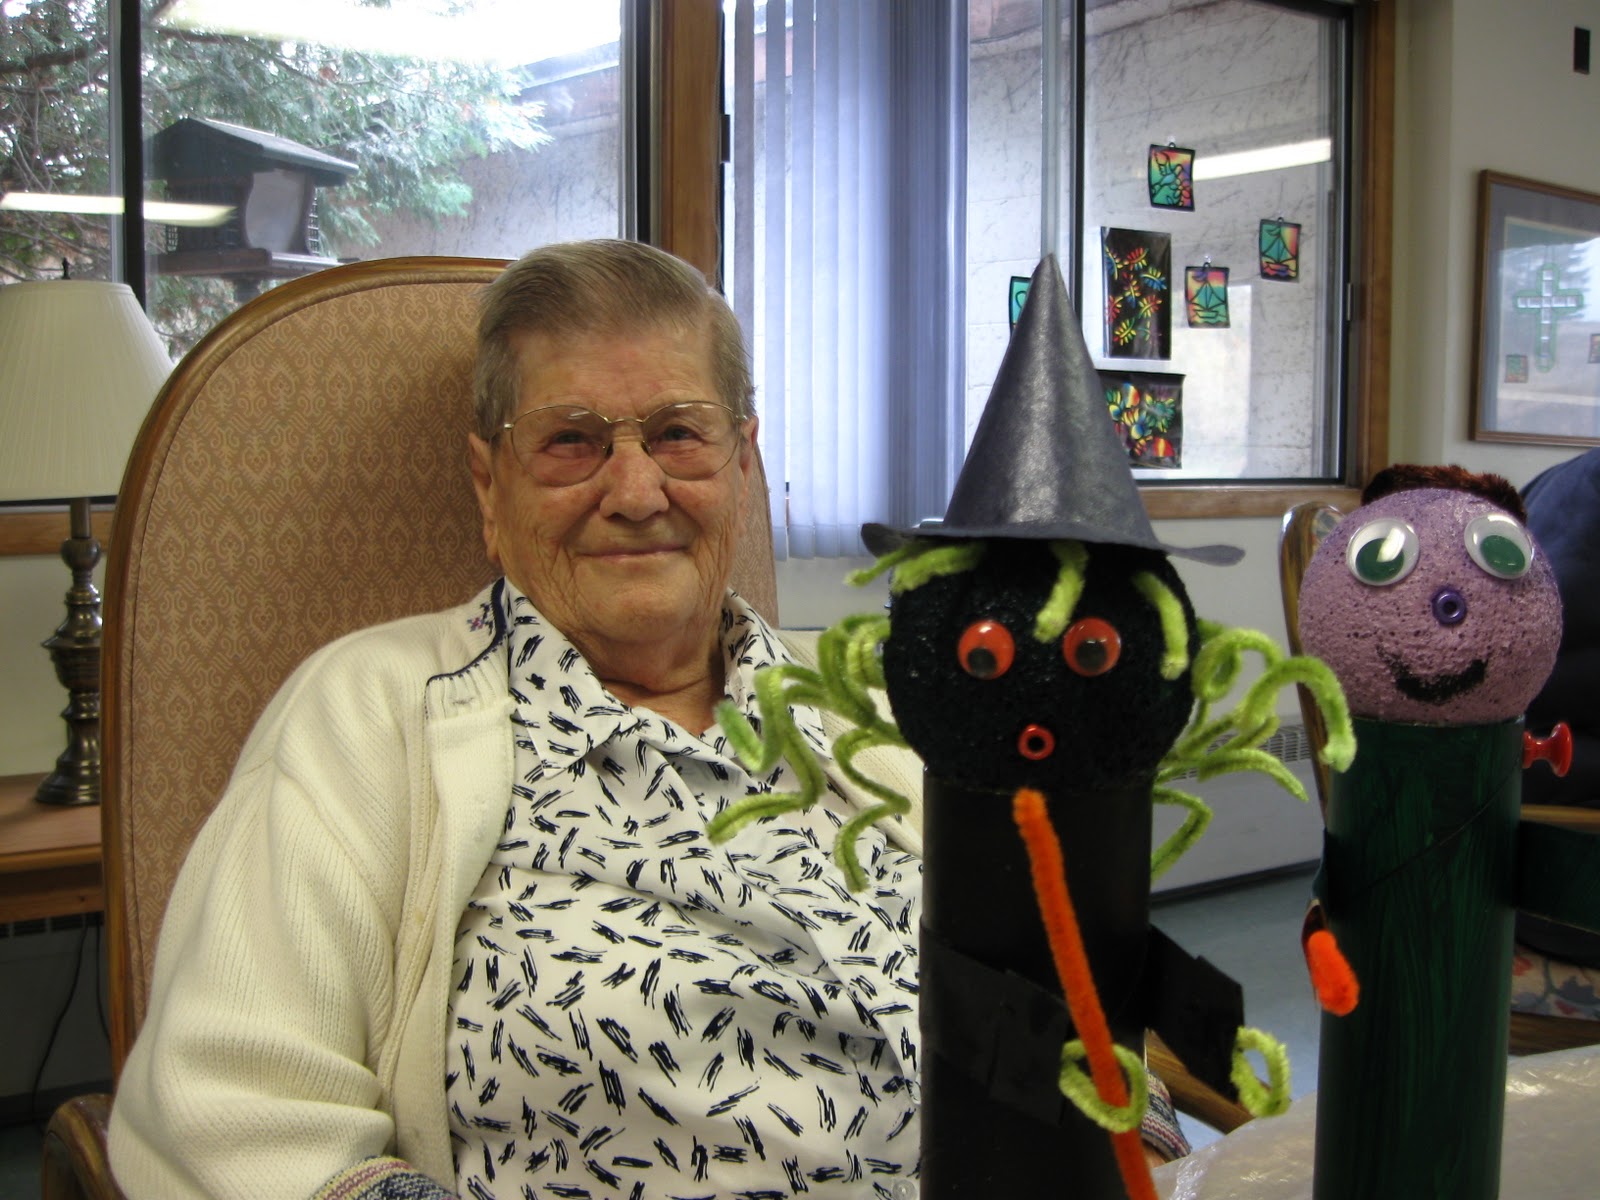
This week we did a quick and fun table decoration for Halloween.  Next week we're going to start on a more complex Christmas centerpiece project for the tables, interspersing their creation with a Thanksgiving project.  The holidays are upon us!

For our Halloween project we used mailing tubes for bodies, Styrofoam balls for the heads, a bit of paper for arms, and pipe cleaners for hands, hair on our monsters and witches, and the handles of the brooms.  We also used pony beads on the faces for mouths or noses, depending on where they landed on the face, and some googly eyes.  To attach the head to the body we used my favorite adhesive, gloss gel.

Supplies:
  Styrofoam balls
  Mailing tubes or Pringle cans or some such tub
  Craft paint - purple, green and black
  Googly eyes
  Pipe cleaners
  Pony beads, optional, you could paint on mouths and noses
  Paper to create wrap around arms, broom bristles, and witch hats
  Gloss gel
  Pushpin for monster neck embellishment (every monster needs a bolt in his neck)
 
We began by painting the mailing tubes for the bodies, black for the witch and green for the monster.  I painted the Styrofoam balls ahead of time at home because they took a bit of time to dry.  I did the witch heads green and the monster heads purple.

Googly eyes were then attached to the heads with gloss gel and a pony bead pushed into the head for a mouth, or sometimes a nose.  When the pony bead landed in nose position a mouth was painted onto the face with a small brush and some of the black paint used for the witch body. 

To get matching paper for the arms I painted a brown paper bag on one side with the same paint used to paint the monster's body.  Next the painted paper was cut into a two-inch wide strip.  Gloss gel was spread onto the inside of the paper and a small loop of pipe cleaner set onto the end with an extra dab of gloss gel.  Finally, the strip was folded shut and glued onto the body.

Witch hair was made by winding a bit of pipe cleaner around fingers or paint brush handles to create little springs that could be pushed into the side of the head below the hat.  Monster hair was two short pieces of pipe cleaner stuck into the top of the head.  Meanwhile, helper, Cathy, sat to the side constructing witch hats and brooms.  Brooms were fringed paper wrapped around a pipe cleaner and glued in place with gloss gel.  Hats were made by googling "making witches hats out of paper."  The real directions used compasses and protractors.  We used paper plates and jar lids to make our circles.  Not as exact but fully functional.

To attach the heads to the mailing tubes a goodly amount of gloss gel was put onto the rim of the mailing tube and the head set in place.  Next the head was lifted off of the mailing tube and the circle of glass gel imprinted onto the head marked the place where an additional amount of gloss gel was dabbed onto the head before it was once more placed onto the mailing tube to dry.  Witch hats were then attached with gloss gel and the final monster touch of a pushpin into the neck completed the projects.
Resting With Friends After a Job Well Done

Nice to Know Notes:
Because our mailing tubes had a cover on the bottom we were able to insert a few stones into the tubes for weight.  Although yarn would work equally well for hair and brooms we happen to have a considerable supply of pipe cleaners.  And as Miss Piggy said, "You got to go with what you got!"

Wednesday, September 14, 2011

Our Paper Quilt

Artfully Arranging
At long last our lovely quilt is finished.  We did it using 10x10 inch designs that were colored in by the residents using crayons or markers.  Markers gave a darker more vibrant color while the crayons resulted in lovely, soft shades of color.  Next, the residents arranged the squares on a piece of black poster board.  Finally, the squares were attached and the board was hung as a wall hanging.

What I especially liked about this project was the many levels of involvement.  Residents were able to choose designs that were of varying skill levels and also choose either crayons or markers to work with.  I like when participants can have choices about the project.  I also like group projects and projects that can be prominently displayed for residents and visitors to enjoy.

Our Lovely Quilt
One oversight in this project - we did not make copies of the designs before they were colored in for a repeat performance of this activity in the future.  Live and learn!

Monday, September 5, 2011

Silk Scarves Revisited

Orange Pink and Yellow Scarf
I recently visited a facility and conducted an activity period where we dyed silk scarves with bleeding tissue, a project that I've shared in the past.  The challenge to working in the space provided was the lack of space.  I love a challenge.

First of all, it was obvious that we'd not be able to set up the Styrofoam board that we usually use as a base for the scarves.  Long story short - I experimented at home and came up with a quick and easy method to dye the scarves using a minimum amount of space.  The trick is to place the scarf on a piece of plastic that's slightly longer and and about two and a half times wider than the scarf.  The scarves, of course, had been soaking beforehand in a 50/50 solution of vinegar and water for about 30 minutes.  This removes the sizing and makes the scarf ready to absorb color.

Once the scarf was in place on the plastic I covered half of the scarf with selected colors of bleeding tissue, the Spectra brand, which is absolutely the best.  The tissue was already cut into squares that were about 3x3 and I used 4 to 5 layers of tissue to provide a rich color.  Next, I folded the other half of the scarf on top of the first half of tissue covered scarf, patted it down, and spritz it with water using a spray bottle.  Finally, I folded the scarf into the plastic, which was actually a piece of drop cloth cut to size, and rolled it up into a sausage shape.  At this point it was a matter of squeezing the plastic enclosed scarf for about a minute to make sure that the color was being absorbed.

Voila!  Once unrolled and dried with a hand held hair dryer the scarf was lovely and ready for the final steps, which include allowing the scarf to rest for 24 hours, and then giving it a final 30 minute vinegar water soak (1/4 cup vinegar to a quart of water) to set the color.  A final clear water rinse and pressing and the scarf is ready to wear. 

Note:  Scarves we use are the 8x54 silk scarves available online from Dharma Trading.  At present they are selling for $2.39 each or $2.24 if you purchase 12 or more.  What a deal!  Spectra bleeding tissue is available online from Dick Blick.  Drop clothes are available in any paint department. 

Final Note:  Make sure you use colors that will bleed well together.  Blue and yellow will create green while red and yellow will create some lovely shades of orange.  Enjoy!

Wednesday, July 27, 2011

Quilt Design II

This is one of my favorite designs for the quilt squares that we're coloring for our wall-hanging, paper quilt.  It's also one of the most difficult to explain.  But here goes.

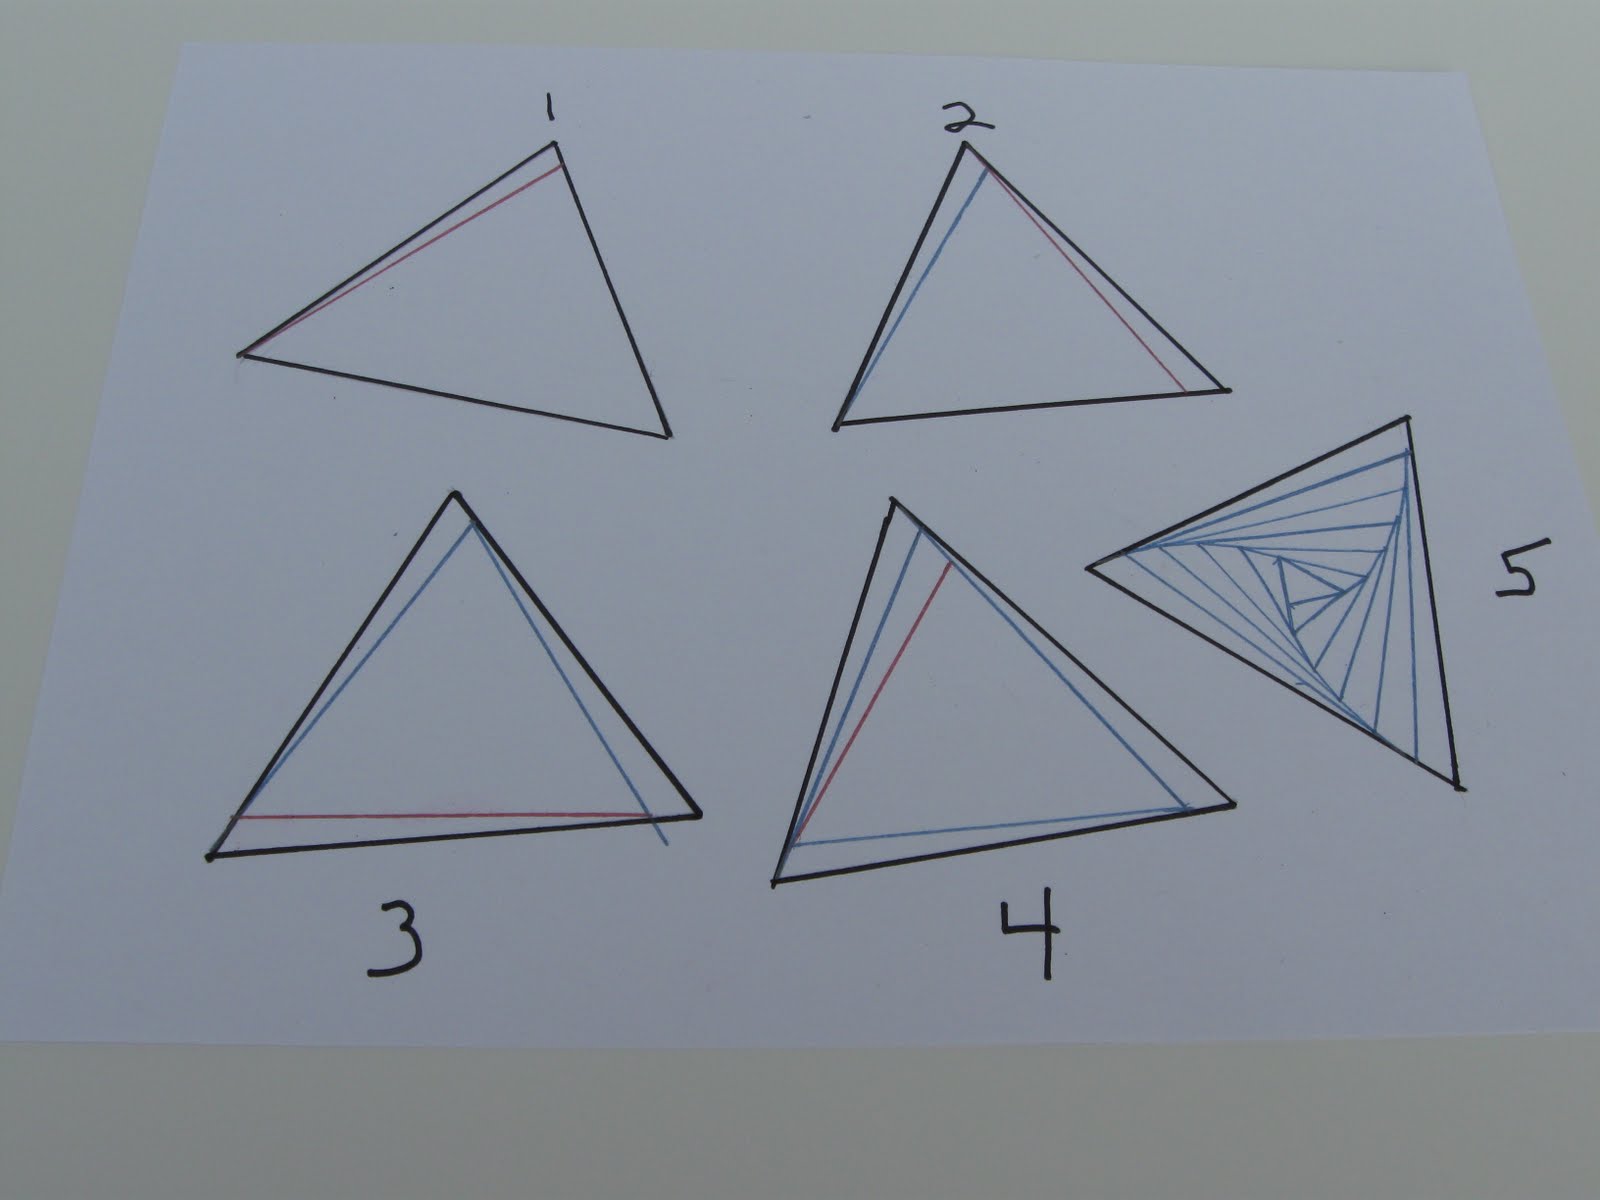
The name of this design is called Rick's Paradox and is done within a triangle.  The first four triangles in the example show the progression of the design, while triangle #5 shows the finished design.  You begin, as shown in triangle #1 by drawing a straight line from one of the sides down to a corner.  Next, turn the triangle and draw another line from the next side down to the corner.  The red lines in the drawings show the line that's added.

Turn the triangle once again and draw your third line, always bringing your new line to a point against the previous line.  Continue turning and drawing lines until you come to the middle.  As you can see in sketch #5, the design looks as if it is a swirl design in spite of the fact that the entire design is made up of straight lines.

A nice size for the triangle would be about 5x5 or larger.   While some residents might become proficient at drawing the design, others might color it in a two or three color pattern.  A great addition to a wall-hanging quilt.

Thursday, July 21, 2011

Cork Trivets

Three Trivets
In the past we've made cork trivets for our arts and crafts group.  The first time we purchased the wooden frames, which were a bit pricey.  The second time we had a generous volunteer, handy with woodworking, who said he could whip up the frames in no time.  That he did but declared that the job was a bit tedious and required way too much time.


But being the recipient of a multitude of corks from a local restaurant I knew there had to be an easier and less pricey way to do the project.  So I got out my favorite adhesive, gloss gel, and wondered if I could simply stick the corks together without a frame.  Voila!  It really works.

Trivet Done in a Pattern
I simply put a nice dab of gloss gel on the parts of the corks that would be touching and they stuck together quite nicely.  Next I let the trivet dry for a few days.  As I final step I'm going to gloss gel them to a base of cardboard, perhaps covered with a nice wallpaper scrap.  I also have some thin pieces of cork tile that might work as a base and give the trivet a little more stability.  An easy project and a delightful way to spend some time together!

Thursday, July 7, 2011

Thinking Inside the Box

Here's another group of designs that can be used for a paper quilt wall hanging.  All of them are based on a checkerboard design with slight variations on that simple pattern.  These variations can create more interesting and sometimes challenging patterns which allows for participation at various skill levels.

The most basic checkerboard design shown is made more complex by doing an X pattern with a second color inside the uncolored squares.  For even greater complexity sections of the X squares can be colored in, which was done in some of the sample squares.

The dark blue pattern is simply straight horizontal lines intersected by wavy vertical lines.  The green and blue design has the vertical lines going off at a slant.  Both of these designs provide larger spaces for coloring in but could be made more challenging by drawing the lines closer together.

The orange designs has both the horizontal and the vertical lines drawn on a slant, with the white space decorated with a circle.  Triangles, squares, stars, or simple stamps could also be used to decorate the uncolored squares. 

The sample shown is simply a piece of card stock divided in four with designs made with markers.   Remember to keep it simple, create community as you create your designs, and sometimes know that it's alright to think inside the box.

Saturday, June 4, 2011

Quilt Design I

We're about to embark on an ongoing project.  The idea is to draw and color quilt squares and then hang them directly on a wall or attached to ribbon in order to make a quilt wall hanging.  For this project we're going to use some of the designs that I learned in a mini-course that I took this spring.  The designs are easy to create and result in some awesome patterns.

This first design is done by laying out a square of dots that are equidistant apart.  On the samples shown the dots are 1.5 inches apart. A smaller distance would work but I wouldn't get much
Dots and Beginning "S" Lines
larger than that.

After the dot pattern is set begin by making the letter "s" from one dot to the dot directly below.  When all the dots are connected in one direction, turn the paper 90 degrees and repeat, creating "s" sided squares.  Don't worry if all of your "s" lines are not exactly alike.  It will still look great.

Finished Square
When your designs is finished you can color in the squares in any number of patterns.  The materials used in the examples are card stock and a black sharpie.

We'll be showing more simple designs in the next week or so and also our final quilt.  What a fun and easy way to quilt!

Tuesday, April 26, 2011

Weaving

This is a simple project that requires just a bit of prep time putting together the base, which consists of some light, plastic fencing edged with duck tape.  For two of the edges I used a plastic edging that someone donated to our project stash.

I did the prep work at home and then took the edged pieces, along with pieces of ribbon and other simple embellishments, to our Tuesday activity group.  Because we used the plastic with the larger holes it was rather simple for the residents to weave the ribbon.  We did have some rather wide ribbon, which we cut down the middle to make sure that all of the ribbon strips were a bit narrower than the holes.

The actual size of the base we used was about 12x15.  The residents wove along the 12 inch length, making each row quite manageable.  Because we added flowers and butterflies the finished projects will be hung on resident's doors to encourage warm spring weather to hurry along.

Wednesday, March 30, 2011

Pretty Kitty Waste Basket

The reference to a cat in the title of this piece has nothing to do with the finished project presented this month.  It has everything to do with the container that's recycled for this project, namely, a cat litter jug. 

To create this project we simply cut the tops off of the containers so they resemble a small waste basket.  I did this with a box cutter to start, and finished off with a scissors.  Next, we took scraps of paper and some embellishments and attached them with our favorite adhesive, gloss gel.   This is most easily done by brushing a section of the container with the gloss gel and placing a piece of decorative paper onto the section.  We used paper cut into 2x2 inch pieces.  Torn pieces of paper would also be nice to use.

It's good to start your first row about an inch from the top.  The row that you place above that can then fold over the edge of the container and create a nice, smooth edge around the top, even if your container is cut a little uneven.

As far as choice of paper you could use old greeting cards, pictures from magazines, or old calendars.  When the project was finished one of the activity people took the containers home and coated them with a few coats of polyurethane.  This did not seem to affect the paper or the embellishments.

Besides using these containers for waste baskets, they could also be used to store magazines or mail.  So very pretty, and the residents loved them!

Wednesday, February 23, 2011

Pretty Paper Part Two

As promised, I have pictures of what we did with the decorative papers that we made by painting brown, paper bags.  The most simple thing to make would be cards, which we still might do in the future.  For our recent gathering, however, some residents combined our handmade, patterned paper with bits of other paper and ribbon to cover boxes to use as plant stands.  There are always those plants with trailing vines that could use a little bit of a lift above the fray.

Some of the other residents used the patterned paper with other paper and bits of ribbon to cover boxes that can be used as trays for their dressers.  A good place for earrings and other odds and ends.  I did some larger pieces of paper, which I'm planning to make into wall hangings.

And as always, we created a sense of community and a sense of fun.  And isn't that the whole point of activities!

Monday, January 10, 2011

Pretty Paper Part One

Right after the busy holiday season we were looking for a fun and easy project.  The project? Painted paper.

Supplies:
  Brown paper bags or craft paper
  Acrylic craft paint
  Brushes
  Masking tape

First the paper bags were cut into manageable pieces.  We cut them into 9 to 10 inch squares.  Next, we taped them into place, taping just two sides, onto flexible plastic that we use for work surfaces.  This kept the paper stable while residents applied the paint.

We then painted the paper with acrylic craft paint and dried the pieces with a hand held dryer.  Finally the paper was decorated with additional colors that were stenciled on, sponged on, or dotted on with a cotton swab.  In the picture you can see strips of blue masking tape along the edges of the paper.  That will be trimmed off so don't worry about the edges.

Bet you wonder what to do with all your lovely looking paper?  That's going to happen on week two of this project and we'll show you next month.  Bet you can come up with some great ideas of your own.

Monday, December 13, 2010

Lovely Ornaments

This month we resurrected an activity that we did last year.  It's simple and fun and the residents were anxious to repeat this project which produces such lovely ornaments.

Supplies:
  Clear plastic ornaments
  Acrylic paint
  Small plastic cups

I purchased the clear, plastic ornaments at Michael's.   They were already on sale at mid-November which gave us plenty of time to fit the activity into our holiday schedule.

The acrylic paint we prefer for this project, although any craft paint will work, is the Prang metallic paint that comes in a variety of glowing colors.  For the ornament nestled on the stars above we used Prang red and gold metallic paint.

First remove the top from the ornament.  Next, simply pour about two teaspoons of any color you choose, letting it pour down the inside of the ornament in two or three different places.  Select a second color and repeat, allowing this color to flow in between the strips of the first color.  Finally, hold a finger or thumb over the opening in the ornament and shake.  We also found that tapping the ornament lightly on the palms of our hands got the paint to flow around and coat the inside of the ornament completely.

Tips - choose two contrasting colors, such as gold and red to get a nice effect.  Also, choose colors that will create a lovely third color when mixed.  This will help avoid the muddy look.  Also, don't be afraid to try three or more colors inside an ornament.

Besides decorating a tree in the facility the residents can use the ornaments to give as gifts to family and friends.   Happy Holidays!

Thursday, November 18, 2010

Talking Turkey

Here's a quick and easy table decoration for your Thanksgiving table.  Supplies include a cardboard tube, some construction paper or wallpaper sample book paper, glue, a bit of ribbon, and googly eyes if you have them.  Drawn on eyes also work well. 

To begin, cut simple feather shapes out of the construction paper or wall paper samples and glue into a fan shape onto the back of the cardboard tube.  Bathroom tissue tubes work well, as do mailing tubes.  You could use food containers, such as containers from Pringles, but you'd need to cover them with paper or paint before attaching the feathers.  Glue or draw on two eyes.  The beaks are a small square of construction paper folded in half and pasted onto the tube just below the eyes.

We then glued the tubes onto circles of brown construction paper and added green or orange feet, which gave us a chance to use up some green and orange construction paper.  Finally, we added a ribbon to make our creation more festive.

We did attempt to attach wattles, or that red hangy thing as we called it, but that got a little too complicated so our turkeys ended up hangy thing free.  We still think that they're cute as can be and are a nice touch to the tables in the dining room.